
Photo by Kelly Sikkema on Unsplash
在 WWDC21時 Apple 發表了StoreKit 2,除了增加更多與商品相關的參數外,也調整了過去 IAP 的程式流程,並使用到同樣時間發表的新技術async /await 讓程式看起來更為簡潔,至於好不好閱讀的話…如果你是習慣使用過去 StoreKit 的流程,在看新流程的時候會需要看個幾次才會比較理解。
Async / await
在正式開始之前,有幾個必需要先知道一下,第一個就是Async/await,非同步處理的新機制,Google 一下會發現其他語言其實早就有實作這樣的機制,主要是為了取代 Closure 的寫法,讓閱讀起來更為方便,在寫法上,想要支援async的 function 就是要在後方加上 async 關鍵字,依照 function 需要可以不用加上 throws,但要記得處理 error。
func purchase(_ product: Product) async throws -> Transaction? {
...
}
在使用這個function的時候就要加上 await 關鍵字
 do {
    if try await store.purchase(product) != nil {
      ...
    }
 } catch {
    print("Error :\(error)")
 }
Testing in Xcode
另一個要知道的是,利用 Xcode 來進行IAP 的測試,過去若需要測試 IAP 流程的話,就必需要去 App Store Connect 建立App 與 IAP 項目,但是要讓 App 可以抓取到 App Store Connect 上的IAP 項目,就需要先提供銀行帳戶資訊給Apple ,還需要同意付款(Apple 付款給你) 的條約,對只是想要練習IAP 的人來說,十分地不方便。
但現在只要做好設定,就可以在Xcode 裡測試IAP 的流程,官方文件在這,Setting up StoreKit testing in Xcode ,所有類型的IAP 項目都可以測試,也可以在沒有網路的情況下測試。
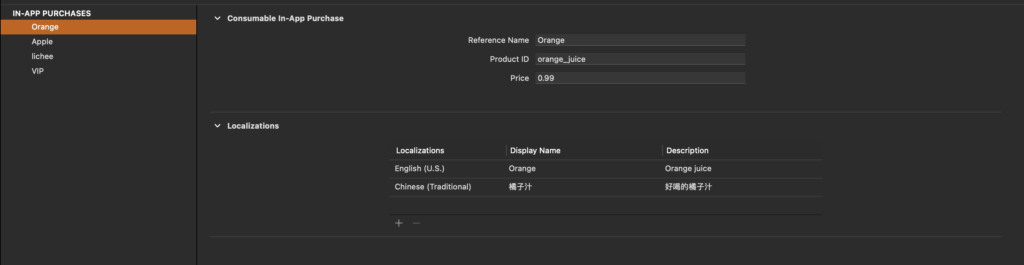
要在 Xcode 最重要的是要設定一個 StoreKit configuration,這個config 檔裡設定了IAP 項目資料,主要是 “Reference Name”、”Product ID”、”Price”,另外還要設定對應不同系語的 “Display name”與”Description” ,是App Store Connect 的簡化版設定,若是要設定Subscription 項目的話也是要設定一個 Subscription Group 的
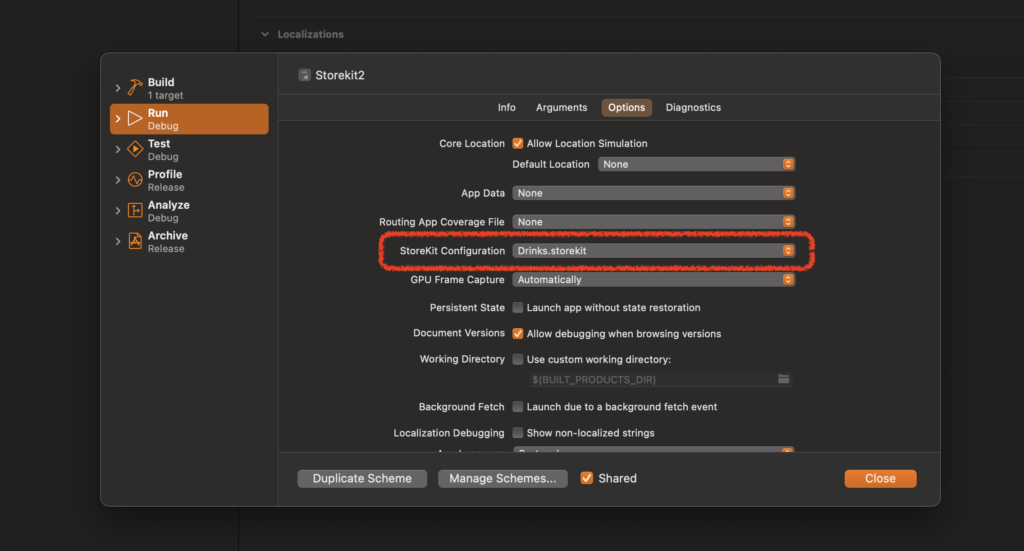
準備好 StoreKit 的 configuration 檔案之後,記得至 Scheme 上選用設定好的Configuration 不然是無法使用的。
前置作業準備好之後,終於要開始進入正題
取得商品資訊
先建立一個 Store manager
和先前一樣,在請求商品資訊的時候,必需要先知道 Product ID 呼叫 try await Product.products(for: productIds) 就可以取得商品
@MainActor
    func requestProducts() async {
        do {
            let storeProducts = try await Product.products(for: productInfo.keys)

            var newDrinks: [Product] = []
            var newVip: [Product] = []

            for product in storeProducts {
                switch product.type {
                case .consumable:
                    newDrinks.append(product)
                case .nonConsumable:
                    newVip.append(product)
                default:
                    //Ignore this product.
                    print("Unknown product")
                }
            }

            drinks = sortByPrice(newDrinks)
            vipTicket = sortByPrice(newVip)

        } catch {
            print("Failed product request: \(error)")
        }
}productInfo.keys指的就是所有的 Product ID,因為productInfo 是個 Dictionary 且 Key 就是 Product ID ,所以直接呼叫productInfo.keys來取得所有的 Product ID
- 這個
requestProducts()使用了@MainActor這是 SwiftUI 為了取代 Dispatch 的語法,由於Product.products(for: productInfo.keys),因為requestProducts()在之後的使用上也想要使用 async / await 的方式,也因為Product.products(for: productInfo.keys)是 基於 async / await 的方式撰寫,因此也加上了async關鍵字
storeProducts取得IAP 項目之後,可以使用product.type得知這個項目是屬於那種類型的項目,可以使用type 就可以來為Product 分類。
購買商品
購買商品的時候是呼叫 try await product.purchase() 就行了,再來就等到結果回傳就好了
func purchase(_ product: Product) async throws -> Transaction? {

        let result = try await product.purchase()

        switch result {
        case .success(let verification):
            let transaction = try checkVerified(verification)

            await updatePurchasedIDs(transaction)

            // finish a transaction
            await transaction.finish()

            return transaction

        case .userCancelled, .pending:
            return nil
        default:
            return nil
        }
    }
func purchase(_ product: Product) async throws它會把 Error 丟出來就表示呼叫它的需要處理 Error 狀態,像這樣的Error 一般需要給使用者回饋反應,所以官方的Demo code 是把這個 Error 丟出來的,讓View 的部分去處理這個 Error ,就看怎麼使用它- result 有幾種狀態,可以依照狀態做各別處理
- success 成功完成動作,它會給一個verification 可以利用這個去取得Transaction
- userCancelled 表示使用者自行取消動作
- pending 表示還未處理完,purchase 正在處於待處理狀態
- checkVerified,在收到 Success 的時候需要去取得Transaction,基本上從官方 Demo code 直接搬過來用就好了
func checkVerified<T>(_ result: VerificationResult<T>) throws -> T {
        //Check if the transaction passes StoreKit verification.
        switch result {
        case .unverified:
            //StoreKit has parsed the JWS but failed verification. Don't deliver content to the user.
            throw StoreError.failedVerification
        case .verified(let safe):
            //If the transaction is verified, unwrap and return it.
            return safe
        }
    }
await updatePurchasedIDs(transaction)這行是為了更新 UI 而做的,所以依照需撾求去處理就好了,可以從 Transaction 當中取得 Product id 或是 Expiration Date ,一共有多少參數可以參考官方件 transaction properties
監聽交易
App 開啟的時候,需要監聽IAP 項目的狀態,在官方的 Demo 是使用 Environment Object 讓App 全部的地方都可以知道其狀態,在 ContentView 要建立 @StateObject var store: Store = Store()再利用 .environmentObject(store) 讓其他頁面使用
因此在 Store manager 需要增加一個 var listenerTask: Task? = nil 用來接收 IAP 項目的狀態,程式也可以直接從 Demo code 裡直接搬來使用
func listenForTransactions() -> Task<Void, Error> {
        return Task.detached {

            for await result in Transaction.updates {
                do {
                    let transcation = try self.checkVerified(result)

                    await self.updatePurchasedIDs(transcation)

                    await transcation.finish()
                } catch {
                    print("Transcation failed verification")
                }
            }

        }
    }
主要是要檢查 Transaction.updates 裡的資料,它們被包在 Task.detached 裡,再來就和 purchase success 要做的事差不多了
更新畫面
最後有教怎麼在進到畫面的時候做IAP 項目是否有購買的確認,首先,在 View 上需要新增一個
@State var isPurchased = false
在 onAppear 的地方寫上下面程式
.onAppear {
    Task {
       isPurchased = (try? await store.isPurchased(drink.id)) ?? false
    }
}
在 store manager 的地方再加上
func isPurchased(_ productId: String) async throws -> Bool {

    guard let result = await Transaction.latest(for: productId) else {
        return false
    }

    let transcation = try checkVerified(result)

    return transcation.revocationDate == nil && !transcation.isUpgraded
}
Transaction.latest(for: productId) 可以得知指定的Product ID 的最後的狀態, transcation.isUpgraded 是只有 Subscription 型的項目才會有的狀態,true 表示已經換成比較高等的服務了
Server?
在官方的說明中,Server 可以利用 Apple 給的 Notification 知道使用者的交易狀態,過去大多數情況都會從 App 端去把 Receipt 上傳給 Server ,但在 StoreKit2的時候並沒有看到相關教學,但也可能是漏看到,在Apple 的新Notification 所能得知的資訊也比先前的更多,當使用者購買行為有任何變更時, Server 都可以收到通知,詳情可以看 Apple store server notifications
Reference
上述程式碼都是用Apple 提供的 Simple code Implementing a store in your app using the StoreKit API 去修改成自己需要的或直接拿來用的,因此可直接參考使用
最後祝大家 Coding 愉快!!